Skip to content
Chicago Know

20 min read ·

The Exterior Trim Around Your Doors and Windows, Explained

It covers the frame-to-wall gap around doors and windows. Recurring gaps, stains or binding can signal concealed problems that fresh caulk may not fix.

Share X in f
Priya Sethi · Updated · 20 min read

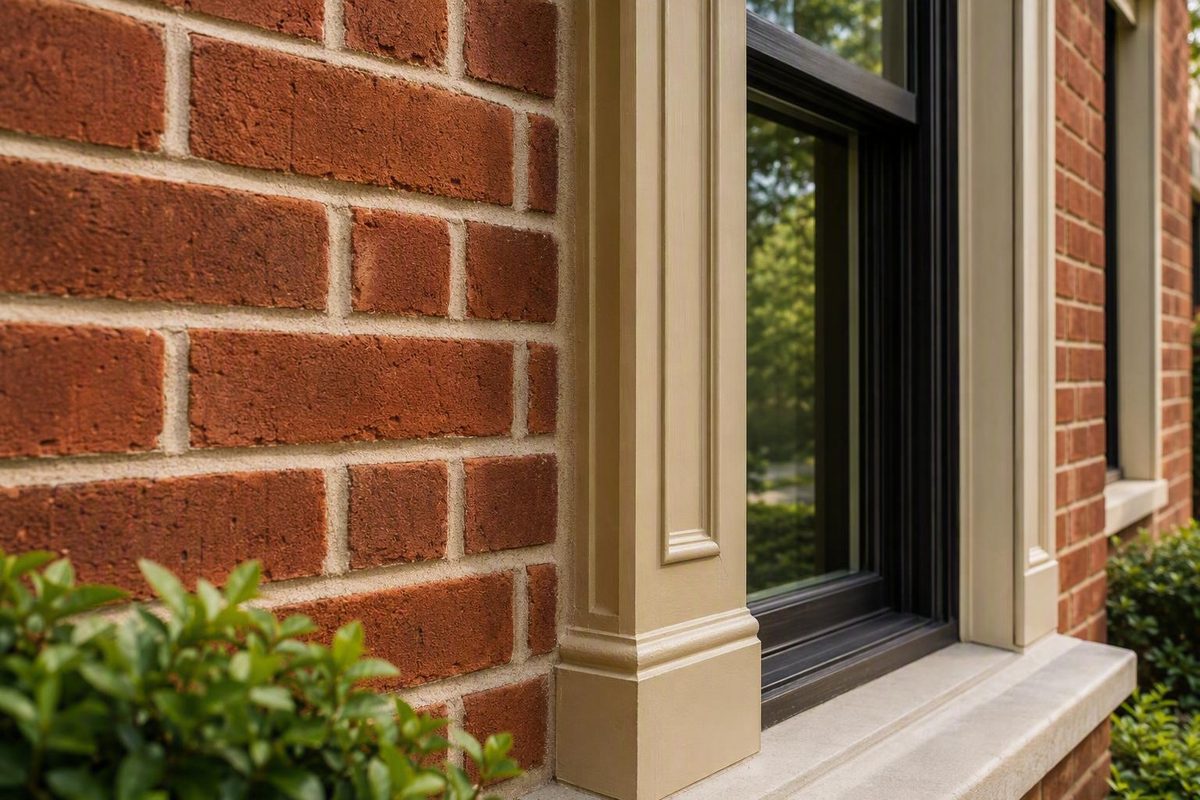
Brick moulding is the exterior casing that finishes the transition between a door or window frame and the surrounding wall finish. Although it looks like a simple strip of trim, choosing or repairing it requires more than matching its color. The profile, dimensions, material, finish, joint layout, and condition of the opening behind it all matter.

The central distinction is straightforward: brick moulding finishes and covers the visible perimeter, but it is not the opening’s entire water-management system. Recurring gaps, staining, deterioration, or binding can indicate movement or concealed problems that another bead of caulk will not necessarily correct.

This guide is a consumer overview, not a construction specification. Exact flashing, fastening, joint, sealant, finishing, and safety requirements must come from the selected door or window system, trim product, surrounding wall system, and any requirements applicable to the project.

What brick moulding is—and what the name does not mean

Brick moulding is exterior casing installed around many door and window frames where the frame meets brick, siding, stucco, or another exterior finish. It covers the installation gap around the frame and creates a deliberate visual border between the opening and the wall.

You may see the term written as:

  • Brick mould
  • Brick mold
  • Brickmold
  • Brickmould
  • Brick molding
  • Brick moulding

These spellings generally describe the same trim category. The exact product can still differ in contour, dimensions, material, finish, and connection details.

Despite the name, brick moulding is not made from brick. A specialist profile catalog identifies wood, exterior-quality MDF, vinyl, and composite versions and describes brick moulding as trim installed where a door or window frame meets the exterior facing material (brickmould profile catalog).

A building also does not need brick cladding to use brick moulding. Depending on the opening and wall design, the trim may meet:

  • Brick or stone masonry
  • Lap or panel siding
  • Stucco
  • Shingles
  • Exterior panels
  • Another compatible exterior finish

Its position is comparable to that of interior casing: both cover the transition between a frame and the surrounding wall. The important difference is exposure. Exterior brick moulding must be selected and finished for rain, sunlight, temperature changes, and exterior moisture rather than treated as ordinary interior trim.

Visually, the moulding gives a door or window depth and definition. A contoured profile may suit a traditional façade, while a flatter profile may fit a contemporary building. Practically, it conceals an irregular installation space and creates a finished edge around the frame.

Introductory component map

flowchart LR
    A[Adjacent exterior cladding] --- B[Brick moulding]
    B --- C[Door or window frame]
    B --- D[Exterior-facing trim surface]

Conceptual identification only. This map names the visible components; it does not show installation layers, flashing, fasteners, drainage paths, or sealant geometry.

How it fits into an exterior door or window assembly

Brick moulding has decorative and practical roles at the frame-to-wall transition. It covers the visible gap, defines the opening, and can form one edge of a properly designed perimeter joint. It should not be treated as an independent waterproofing system.

An exterior opening may include:

  • A door or window frame
  • A rough opening and structural backing
  • Flashing or another water-control detail
  • A weather-resistive or water-control layer
  • Cladding or masonry
  • Drainage paths and clearances
  • Exterior trim
  • Compatible perimeter-joint materials

The arrangement varies with the opening and wall. Masonry, stucco, lap siding, and other wall systems also have different interfaces.

Manufacturer guidance for exterior trim describes trim, flashing, siding, sealants, and a weather-resistive barrier as separate parts of the exterior envelope. It also explains that wood and cellular PVC move differently and therefore require material-specific installation practices (AZEK comparison of PVC and wood trim).

Conceptual assembly relationship—not a construction detail

flowchart LR
    A[Rough opening and backing] --> B[Door or window frame]
    C[Water-control layer or flashing] --> D[Opening perimeter]
    E[Brick moulding] --> D
    F[Cladding or masonry] --> D
    G[Specified perimeter joint] --> D

This diagram shows relationships, not physical laps or placement. It does not prescribe flashing sequence, drainage openings, fasteners, sealant depth, or required clearances.

This distinction helps explain why repeated caulking is not always an effective repair.

Sealant should not be applied indiscriminately. Whether a joint is intended to be sealed—and how it should be prepared—depends on the defined assembly.

Before altering the opening, obtain the current instructions for the door or window, the selected trim, and the surrounding wall system. Verify whether project-specific local requirements also apply. No single cross-section or perimeter treatment is appropriate for every door, window, sill, garage opening, or cladding type.

Wood, cellular PVC, composite, and other material options

Commercial sources list traditional wood along with cellular PVC, composite, urethane, vinyl, aluminum, fiberglass, and some exterior-rated engineered products. Availability varies by supplier, region, profile, and whether the trim is sold separately or as part of a coordinated opening system.

No category is the universal winner. Selection should account for exposure to water, heat, and sunlight; the desired profile and finish; maintenance expectations; architectural character; repairability; and the exact manufacturer’s requirements.

Material category Moisture or temperature considerations Finish options Maintenance considerations Profile availability Questions to ask
Solid or finger-jointed wood Absorbs moisture and changes dimensions as moisture conditions change Commonly painted; stain suitability depends on the product Coatings, cut ends, and exposed edges require attention Traditional and custom contours may be available Is it exterior-rated? How must faces, edges, and cut ends be protected?
Cellular PVC Absorbs very little water; movement is associated mainly with temperature Some white products may remain unfinished; compatible paint may be allowed Inspect joints, fastening, surface condition, and any applied finish Common and specialized profiles are available Which fasteners, adhesive, sealant, joint treatment, expansion allowance, and paint are approved?
Composite Depends on the exact formulation Product-specific Follow the named product’s instructions rather than assuming wood or PVC practices apply Standard and system-specific profiles may be available What is its composition, exterior rating, fastening method, and finish requirement?
Urethane Product-specific Product-specific Verify exterior suitability and finishing instructions Decorative profiles may be available Is the exact profile approved for exposed exterior use?
Vinyl Product-specific; temperature movement may matter Factory color or paintability depends on the product Inspect joints and connections to the frame or cladding Often associated with particular systems Can it be painted, and how is it connected?
Aluminum Product-specific; does not behave like wood Commonly supplied as a finished system component or wrapping product Follow instructions for cuts, corners, and interfaces Often system-specific How must cuts and connections be treated?
Fiberglass Product-specific Factory or field-finishing options vary Use the system manufacturer’s repair instructions Availability may be limited in some markets Is it separate moulding or part of a coordinated opening system?
Exterior-rated engineered material Depends on formulation and edge treatment Usually governed by a specified coating system Exposed cuts and coating condition may be important Supplier-dependent Is the exact product approved for this exterior application?

The table identifies categories and purchasing questions, not uniform performance ratings. Broad labels such as “composite” or “engineered” do not reveal how an individual product must be cut, fastened, sealed, or finished.

Wood behavior. Wood absorbs moisture and moves as moisture conditions change. Exposed end grain, cut edges, and surfaces that will become inaccessible need the protection specified for the product. If a protective coating fails and the material is repeatedly wetted, deterioration may follow. Wood can nevertheless be a practical choice where profile fidelity, appearance, repairability, or compatibility with an existing building is important.

Cellular PVC behavior. Cellular PVC absorbs very little water but is not dimensionally motionless. Its movement is driven mainly by temperature, so long runs, corners, miters, butt joints, and dark finishes can require different treatment from comparable wood details.

Manufacturers describe cellular PVC as resistant to biological rot and insect feeding. That is a material claim, not proof that the entire door or window assembly is protected from moisture.

Paint requirements are product-specific. Westlake Royal lists its RM 180 cellular PVC profile as paintable with acrylic latex paint and calls for vinyl-safe paint when darker colors are used (Royal RM 180 product specifications). That direction applies to the cited product and should not be assumed to govern every PVC formulation.

Other materials. Composite, urethane, vinyl, aluminum, fiberglass, and exterior-rated engineered products expand the available choices, but the category name is not an installation specification.

Avoid making a selection based on slogans such as “maintenance-free” or “lasts forever.” The supplied evidence does not establish a universal service life, lifecycle cost, environmental ranking, or outcome for every exposure.

A scenario-based comparison is more useful:

  • Repeatedly wet lower area: Consider the trim’s moisture response, but also investigate drainage, clearances, and concealed materials.
  • Strong sun or dark finish: Verify thermal-movement and paint restrictions for the exact product.
  • Historic profile match: Prioritize contour accuracy, finish, and the possibility of custom fabrication.
  • Low-maintenance objective: Compare joint behavior, cleaning, finishing, and repair requirements—not only resistance to rot.
  • Sheltered traditional opening: Exterior-rated wood may remain practical when appropriately protected and maintained.
  • Integrated modern system: A flat, flush, metal, vinyl, or system-specific profile may be more appropriate than traditional contoured brick moulding.

Profiles, dimensions, and the WM180 reference

Brick moulding has no single universal size. Products vary in:

  • Face width
  • Projection or depth
  • Overall thickness
  • Contour
  • Back relief or engagement detail
  • Length
  • Material
  • Texture
  • Factory finish
  • Integrated features such as a nail fin or J-channel

Approximately 1¼ inches thick by 2 inches wide is a useful representative example, not a mandatory standard. One manufacturer lists its RM 180 cellular PVC profile at 1¼ by 2 inches. Retail listings also include WM180-style wood and PVC products with actual dimensions of approximately 1.25 by 2 inches, and stock-length categories of 7, 8, 10, and 17 feet (retail size and length examples).

Common label versus actual product

COMMON OR NOMINAL DESCRIPTION
“1-1/4 in. x 2 in. WM180”

             Compare with:

ACTUAL PRODUCT
Face width:       __________
Projection/depth: __________
Contour/template: __________
Back detail:      __________
Material:         __________
Stock length:     __________
Finish:           __________

Written dimensions alone rarely capture a moulding profile adequately. When matching existing trim, use a clean cross-section if one is already available and safe to handle. A tracing on stiff paper, a thin template, or straight-on and end-view photographs with a ruler can help a millwork supplier compare the shape.

Measurement worksheet

Item to document Measurement or observation
Opening type Door / window / garage / other
Actual face width
Actual projection or depth
Overall contour
Back relief, groove, fin, or channel
Opening width
Opening height
Head-joint configuration Mitered / butt joint / other
Side-to-sill or threshold connection
Longest required finished piece
Available stock length
Material
Factory or field finish
Texture and color
Frame connection
Adjacent cladding and joint width
Extra material needed for cuts or rejected sections

Stock lengths vary by seller and product. Specialty-retailer listings include several products between approximately 72 and 96 inches, as well as longer options (specialty retailer brickmould listings). An inventory-friendly length is not necessarily the best cutting length for a particular opening.

Allow enough material for the actual joint layout, test cuts, miters, and unusable sections, but do not assume a universal waste percentage. A narrow door, wide garage opening, and window with a separate head detail require different cutting plans.

Custom fabrication may be worth investigating when historic or discontinued trim cannot be matched. A supplier may request an intact sample, tracing, template, or dimensioned drawing. Custom work is a possibility, not a guarantee that every old profile can be reproduced in every material.

A practical shopping and selection checklist

Begin with the application rather than the shelf label. A product marked “brick moulding” may still be unsuitable for the opening.

Use this checklist before buying individual lengths, a kit, or a specialized system:

  • [ ] Identify the application. Is this an exterior door, window, garage opening, or another exposed frame transition?
  • [ ] Confirm the frame system. Is the trim independent, attached to the frame, or integrated with a door or window unit?
  • [ ] Record actual dimensions. Measure face width, projection, contour, and back details.
  • [ ] Confirm the material. Do not assume wood, PVC, and composite use interchangeable installation methods.
  • [ ] Check stock length. Confirm that every required piece can be cut from the available lengths.
  • [ ] Document the joint layout. Record miters, butt joints, scarf joints, and system-specific connections.
  • [ ] Compare the contour physically. Use a sample, tracing, cross-section, template, or dimensioned photographs.
  • [ ] Check compatibility with the frame and cladding. Consider the connection, projection, and planned perimeter interface.
  • [ ] Verify the finish. Determine whether the product is unfinished, primed, factory colored, or intended to remain unpainted.
  • [ ] Check the package format. Is it an individual length, pre-mitered kit, or system-specific component?
  • [ ] Identify integrated features. Some profiles incorporate a nail fin, J-channel, or another specialized edge.
  • [ ] Read current instructions. Verify the specified fasteners, adhesive, sealant, primer, paint, and movement allowances.
  • [ ] Check treatment of cut edges. Determine whether ends require coating, sealing, adhesive, or another treatment.
  • [ ] Inspect a physical sample. This is especially important when contour or color matching matters because displayed colors may not accurately reproduce the product.
  • [ ] Confirm current availability. Inventory, shipping claims, ratings, product counts, and prices can change.
  • [ ] Consider proportional fit. The surround should relate sensibly to the opening and nearby façade details.
  • [ ] Consider alternatives. Flat trim, flush detailing, a custom profile, or no traditional brick moulding may suit some assemblies.

If the trim belongs to a coordinated door or window system, verify substitutions against that system’s current instructions before purchasing.

How to inspect brick moulding and identify likely failure

Inspect brick moulding as the visible part of a larger opening. Damage at the trim may reveal a maintenance problem, but appearance alone cannot establish where water entered or how far deterioration extends.

Warning signs include:

  • Soft wood
  • Visible rot or crumbling fibers
  • Peeling, blistered, or missing paint
  • Cracked or missing exposed sealant
  • Open miters, butt joints, or scarf joints
  • Dark staining or recurring wet marks
  • Swelling or distortion
  • Loose trim
  • Pest evidence
  • Gaps that return after repair
  • A door or window that begins to stick
  • Deterioration in an adjacent jamb, sill, or threshold

Lower ends near sills and thresholds deserve attention because they can be repeatedly exposed to runoff or remain wet after other parts of the opening dry. Conditions differ, however: trim ending near paving has a different exposure from trim around a sheltered upper-floor window.

Possible contributors include age, weather exposure, failed coatings, failed sealant, pooling water, installation defects, pests, moisture-related movement in wood, and temperature-related movement in PVC. More than one condition may be present. Similar-looking gaps in wood and PVC do not necessarily have the same cause.

A home-inspection overview identifies gaps, rot, pest damage, cracked caulk, moisture staining, and nearby pooling as conditions inspectors examine.

Use this as a cautious observation sequence rather than a diagnostic standard:

  1. Look from inside. Note stains, swelling, finish damage, or changes in operation.
  2. Look from outside. Examine the head, side pieces, lower ends, sill or threshold, and adjacent finish.
  3. Watch for patterns. Record whether staining follows rain, snowmelt, irrigation, or washing.
  4. Examine coatings and exposed joints. Note peeling paint, exposed edges, open corners, and visibly split sealant.
  5. Avoid destructive probing. Do not puncture intact finishes or disturb unstable material merely to test it.
  6. Check the adjacent jamb visually. Damage beyond removable casing can change the likely scope.
  7. Look above and beside the symptom. A lower stain does not prove that water entered at that exact point.
  8. Document conditions. Photographs taken under repeatable conditions can help with later professional evaluation.

Separate finish failure from substrate deterioration. Firm, stable, dry material may need cleaning, surface preparation, refinishing, or servicing of an appropriate exposed joint. Soft, loose, rotten, swollen, or persistently stained material warrants a broader evaluation.

Seek appropriately qualified help when staining returns, jamb or framing material appears soft, pests are present, the opening binds, or the source and extent of moisture cannot be established without opening the assembly.

Repair, partial replacement, or full replacement?

The following framework is a conservative screening aid, not a diagnostic or construction standard. Visible symptoms alone cannot reliably establish substrate condition or concealed damage.

Possible outcome Starting conditions Main caution
Coating or exposed-joint maintenance The substrate appears firm, stable, and dry; the issue is limited to dirt, coating wear, or an identifiable serviceable joint Confirm that the joint is intended to be sealed and moisture is not recurring
Localized trim repair Damage appears confined to a short section and sound trim and backing remain around it Inspect behind the removed section before closing the repair
Full surround replacement Several pieces are loose or damaged, joints repeatedly open, or the profile is extensively deteriorated Removal may expose a larger opening or wall problem
Professional investigation Jamb, backing, sheathing, or framing appears soft; stains return; pests or extensive growth are present; operation has changed Delay cosmetic closure until the source and extent are understood

Maintenance may be reasonable where the material is firm and dry. Cleaning, preparation, paint touch-up, or renewal of an identified serviceable joint can restore the exposed finish. Do not use new caulk to conceal wet material, loose paint, or an unexplained opening.

Localized replacement may be possible when deterioration is genuinely confined to a short section and the remaining trim, jamb, backing, and framing are sound. One documented DIY project describes removing a deteriorated lower section and fitting a PVC patch into sound backing (localized lower-section repair example).

That project’s proposed patch length, fitting clearance, sill angle, nail choice, and material selection are examples from one contributor’s repair, not universal instructions. A window sill, door threshold, garage surround, and flat-bottomed frame can require different cuts and interfaces.

Full replacement may be more sensible when several legs are damaged, fasteners no longer hold, joints repeatedly reopen, or the profile cannot be patched neatly.

Professional investigation takes priority when concealed conditions are uncertain or the apparent damage extends beyond removable trim. Cosmetic replacement should not be used to cover suspected deterioration in the opening or wall.

Screening decision tree

flowchart TD
    A[Start with visible condition] --> B{Does the substrate appear firm, stable, and dry?}
    B -->|Yes| C{Limited to coating or an identified serviceable joint?}
    C -->|Yes| D[Maintenance may be appropriate]
    C -->|No| E[Assess attachment and extent]
    B -->|No or uncertain| F[Broader or professional investigation]
    E --> G{Is damage isolated to one short section?}
    G -->|Yes| H[Remove enough to inspect concealed conditions]
    H --> I{Backing appears sound and dry?}
    I -->|Yes| J[Localized repair may be considered]
    I -->|No or uncertain| F
    G -->|No| K[Consider full surround replacement]
    D --> L{Does moisture or movement recur?}
    J --> L
    K --> L
    L -->|Yes| F
    L -->|No| M[Complete work under product-specific instructions]

Local labor, access, materials, finishing, and concealed conditions can change project cost substantially. The supplied evidence does not support a reliable universal cost range.

Replacement workflow and ongoing maintenance

Brick-moulding replacement is best understood as an inspection-and-reassembly project, not merely a trim swap. The following is a high-level planning sequence. It does not establish cutting dimensions, fastening schedules, flashing details, or sealant placement for a particular opening.

  1. Document the existing profile. Photograph the head, sides, lower connections, joints, and cladding interface.
  2. Confirm the replacement product. Compare material, actual contour, stock length, finish, and current instructions.
  3. Identify applicable work and safety instructions. Obtain the directions for the opening, trim, coatings, sealants, tools, and any materials that may be disturbed.
  4. Separate existing exposed joints carefully. Avoid assuming that every concealed layer can be cut or removed.
  5. Remove trim in a controlled manner. Limit damage to the frame, cladding, backing, and any concealed components.
  6. Inspect what removal exposes. Look for wet or soft material, unstable backing, pest evidence, or conditions that expand the scope.
  7. Stop if the scope changes. Do not close over concealed deterioration merely to complete the cosmetic work.
  8. Measure again. Removal may reveal dimensions or connections that were not visible earlier.
  9. Cut and dry-fit replacement pieces. Check contour alignment, joints, clearances, and relationships to adjacent finishes.
  10. Fasten only into suitable backing. Follow the selected product’s fastener type, spacing, edge distance, and installation method.
  11. Treat joints as specified. Wood, cellular PVC, and engineered products do not necessarily use the same preparation.
  12. Complete the exposed perimeter detail as specified. Preserve any function the defined assembly requires.
  13. Apply the compatible finish. Follow the trim and coating manufacturers’ current instructions.
  14. Check operation. Confirm that the door or window operates as it did before the work.
  15. Retain documentation. Keep product names, instructions, paint information, and photographs for future maintenance.

One personal DIY account used a pre-mitered kit and installed the head piece before the side pieces (door-surround replacement example). That sequence reflects one project and is not a rule for every frame, joint design, kit, or cladding condition.

Fastener material, spacing, edge distance, adhesive, movement allowance, and joint treatment are product-specific. Corrosion-resistant exterior fasteners appear in manufacturer guidance for some exterior trim products, but one brand’s schedule should not be transferred automatically to another material or substrate.

PVC-to-PVC joints may require a compatible adhesive and compression while the bond forms. Wood commonly requires protection on cut ends, edges, and faces that will become inaccessible. Composite and engineered products may specify different treatments.

Do not treat a general DIY account as authority for filling perimeter gaps with expanding foam. The cited project involved unusual large gaps and does not establish a default treatment for other doors or windows. Use only the insulation or air-sealing product and application method permitted by the applicable opening and material instructions.

Painted cellular PVC may require an approved exterior acrylic or vinyl-safe coating, particularly for darker colors. Some white PVC products may be left unpainted, but that does not mean all white trim products have identical finishing requirements.

Ongoing maintenance checklist

  • [ ] Clean dirt and buildup using methods compatible with the trim and finish.
  • [ ] Inspect paint, factory coatings, and exposed cut edges.
  • [ ] Check miters, butt joints, and perimeter joints for movement.
  • [ ] Touch up compatible coatings before large areas become exposed.
  • [ ] Look for staining after wet weather.
  • [ ] Keep sills, thresholds, and visible drainage areas clear of debris.
  • [ ] Check that lower trim ends are not sitting in persistent water or soil.
  • [ ] Note changes in door or window operation.
  • [ ] Investigate recurring moisture rather than repeatedly covering it.
  • [ ] Retain product and finish information for later repairs.

Stop work when removal exposes conditions beyond the intended trim replacement, including unstable backing, concealed decay, suspected pests, extensive unidentified growth, or an opening that no longer operates correctly. This guide does not provide procedures for hazardous coatings, biological contamination, dust control, tool operation, or personal protective equipment. Obtain authoritative, project-specific instructions before disturbing unknown older coatings or machining trim materials.

Frequently asked questions

Can a house with siding or stucco have brick moulding?

Yes. The name identifies the trim category, not a requirement that it meet brick. Brick moulding can surround doors and windows next to siding, stucco, masonry, and other exterior finishes. The selected profile and perimeter detail must still be compatible with the particular frame and wall system.

Is brick moulding required around every exterior door or window?

No. Some openings use flat exterior trim, flush detailing, integrated fins or channels, metal wrapping, custom casing, or no traditional brick-mould profile. Manufacturer guidance notes that brickmould may be omitted or replaced by flush trim in some modern or minimalist designs (brickmould placement and alternatives).

Is WM180 brick moulding always 1-1/4 inches by 2 inches?

No. Approximately 1¼ by 2 inches is a common manufacturer and retail example, but the WM180 label does not guarantee identical dimensions or geometry across suppliers. Verify the actual face width, projection, contour, back detail, material, and stock length.

Can cellular PVC brick moulding be painted a dark color?

Sometimes, but only with a coating permitted by the trim manufacturer. Dark colors can be subject to product-specific restrictions. Check the current instructions for both the trim and paint rather than relying on a general rule for all cellular PVC.

Can only the rotted bottom section of brick moulding be replaced?

Potentially. A localized patch may be appropriate when deterioration is genuinely confined to a short section and the adjacent jamb, backing, rough opening, and framing remain sound and dry. Remove enough material to assess what lies behind the damaged section. If softness or staining continues, moisture recurs, or the opening’s operation changes, broaden the investigation rather than installing a cosmetic patch.

The practical sequence is to identify the component, document its actual profile, select a material suited to the opening’s exposure and maintenance needs, and inspect the surrounding assembly before treating visible damage. Sound brick moulding can finish an opening neatly. Recurring gaps, staining, deterioration, or binding call for investigation of the underlying assembly—not simply another bead of caulk or an unexamined patch.

Get the next article first

One email when we publish, covering evergreen Chicago discovery through neighborhoods, architecture, lakefront walks, and practical routing.

We respect your privacy. Unsubscribe anytime.